RotaJakiro Lab Walkthrough - CyberDefenders
malware_analysiscyberdefenderswalkthroughghidrax64dbg
2609 Words | 11 Minutes, 51 Seconds
2025-07-29 14:43 +0000
Check the Lab out on Cyberdefenders: https://cyberdefenders.org/blueteam-ctf-challenges/rotajakiro/
Overview
This walkthrough focuses on malware analysis and reverse engineering, specifically examining the RotaJakiro sample provided by CyberDefenders.org. If this is your first time on the platform, I highly recommend exploring their other challenges as well.
In this guide, I’ll show you how to complete the challenge using Ghidra. If you’d like to match my environment, set up a VM using the Remnux image (available at Remnux’s offical site).
Tools needed (all included in the Remnux image):
- Ghidra
readelfstrace
Preface: This is not going to show you the absolute fastest and most efficient way to complete this lab challenge. For a lot of the write-ups I do, they are meant for you to get the chance to learn as much as you can. So we may be doing some things in a more difficult way then needed, that’s OK! Its better to get your first stab at certain techniques on these easier binaries. It will make the harder ones a much more pleasant experience.
First Steps
Before diving into the challenge questions, I like to research the malware sample provided. In this case, we’re analyzing RotaJakiro, a Linux backdoor. It was first seen in 2018 but remained undetected for three years until researchers publicly documented it in 2021.
When researching, don’t just skim automated sandbox reports — look into whitepapers, technical write-ups, and blog posts from the researchers who discovered it. This can provide valuable context and possibly help you answer later questions more efficiently.
You can also run the sample’s hash through multiple threat intelligence platforms. Incidentally, our first challenge question asks for the SHA256 hash of the sample.
Suggested resources:
- https://attack.mitre.org/software/
- https://tria.ge/
- Original discovery report: https://blog.netlab.360.com/stealth_rotajakiro_backdoor_en/
- https://otx.alienvault.com/
Question 1: What is the SHA256 hash of the file?
This one is straightforward. You can either:
- Run:
sha256sum RotaJakiro.malware
- Or copy it from the import summary after loading the sample into Ghidra.
Important: If you researched the malware earlier, you’ll know this sample attempts to delete itself upon execution. To avoid losing it, make a copy and import that into Ghidra. That way, if something goes wrong, you won’t need to re-import from scratch.
Once imported, you can find the SHA256 hash in the Import Summary window.
Q2: What is the entry point address of the binary if the image base is 0x400000?
When identifying a binary’s true entry point, remember that malware authors often use packers to obscure this location. Packers not only make reverse engineering harder but can also prevent tools like Ghidra from detecting it automatically.
What is a Packer?
A packer is a program that takes an executable and compresses or encrypts its code and data, then wraps it in a small stub of code.
When the packed program is run, the stub decompresses or decrypts the original program into memory and then executes it.
Packers are used for legitimate purposes (reducing file size, protecting proprietary software) but are heavily abused by malware authors to:
-
Obfuscate code so static analysis tools can’t easily read it.
-
Hide the true entry point to delay or confuse reverse engineers.
-
Evade antivirus detection by making the binary appear different from known signatures.
Effects on Analysis:
-
Most original code is hidden inside compressed/encrypted blobs.
-
Import tables are small — only containing functions used by the unpacking stub.
-
High entropy in sections (random-looking binary data).
-
Disassemblers often show junk instructions before the unpacking routine.
Common packers include UPX, ASPack, Themida, MPRESS, and custom in-house packers.
Signs a Binary is Packed
- High entropy: Randomized binary data, visible in Ghidra’s Entropy Overview (red = high, blue = low).
- Packer headers: For example,
UPXin section names indicates the UPX packer. - Minimal imports: Packed binaries often only import a small number of functions.
- Unusual section names/sizes.
In our case, this binary shows low entropy and none of the usual packer indicators — so it’s likely unpacked.
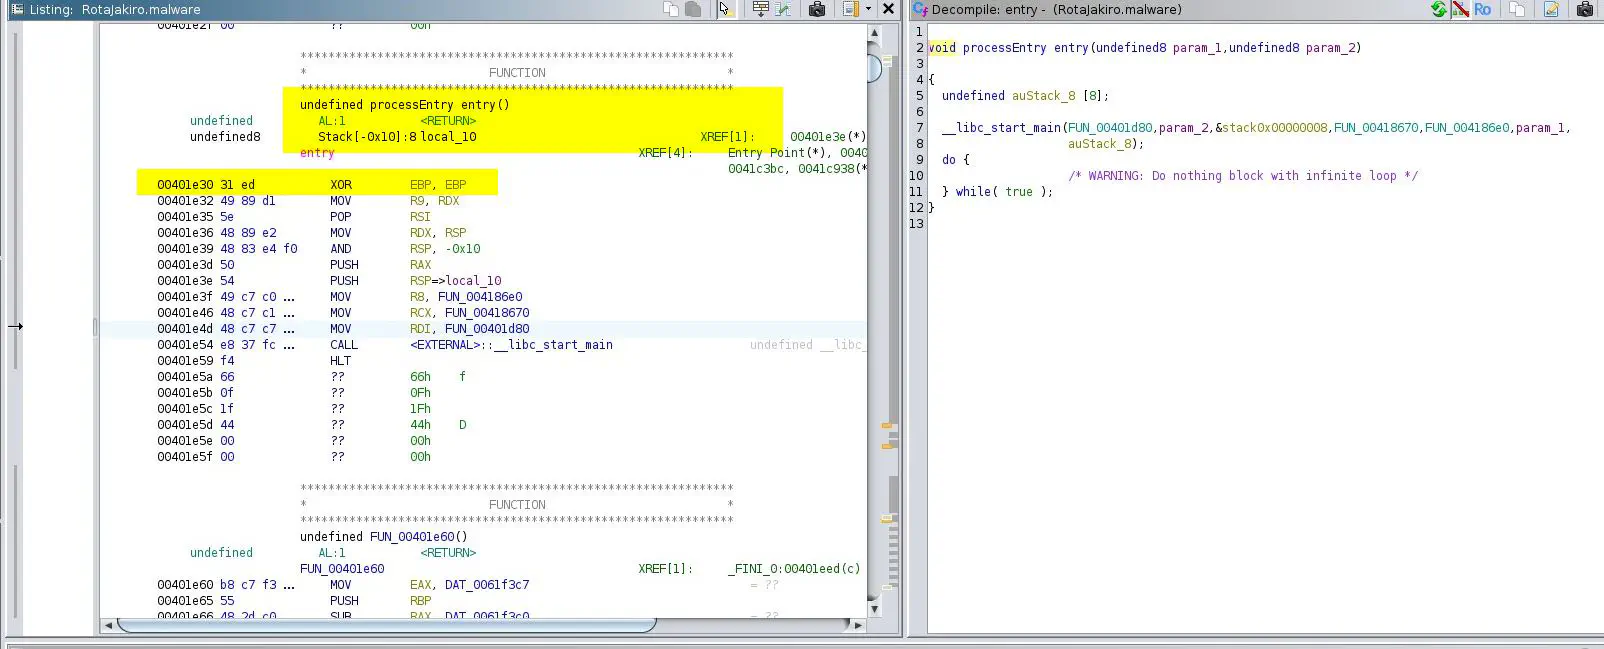
Finding the Entry Point
Because it’s not packed, this is easy:
- Using
readelf:
readelf -h RotaJakiro.malware
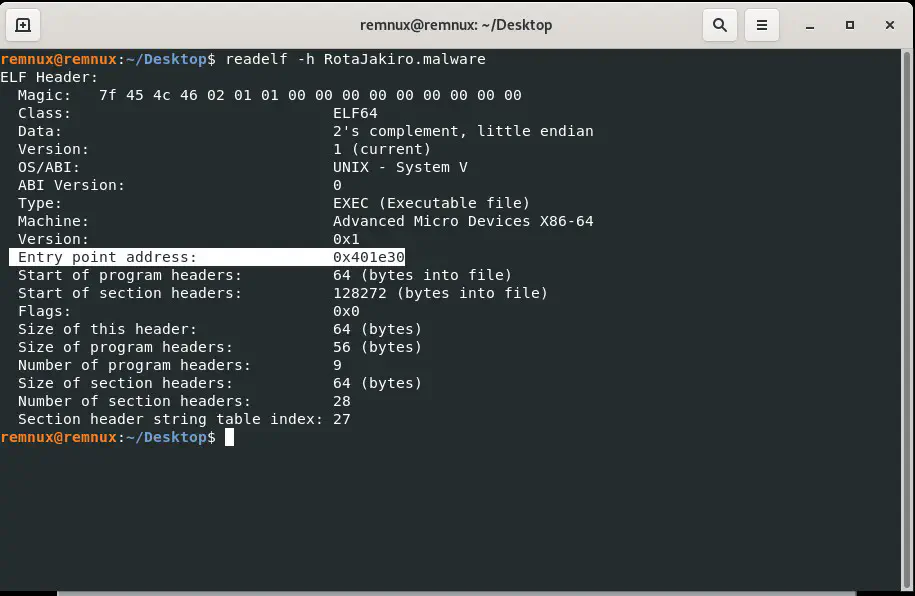
- Or simply follow Ghidra to
_libc_start_main.
Q3: How many sections in the file contain executable code?
ELF files are divided into sections, each described in the Section Header Table.
The section header table contains metadata about each section, including:
- Name (
sh_name) - Type (
sh_type) - Flags (
sh_flags) - Address in memory (
sh_addr) - Offset in file (
sh_offset) - Size (
sh_size)
At runtime, certain sections are loaded into memory according to the program headers, and the flags determine their permissions.
The sh_flags attribute tells us about each section’s permissions and purpose.
Flags of interest:
| Flag | Value | Meaning |
|---|---|---|
SHF_WRITE |
0x1 | Section is writable |
SHF_ALLOC |
0x2 | Section occupies memory at runtime |
SHF_EXECINSTR |
0x4 | Section contains executable instructions |
We care about SHF_EXECINSTR, which marks sections containing machine code.
When the program is loaded, these executable sections are mapped into memory with execute permissions.
Method 1: Using readelf
readelf -S RotaJakiro.malware
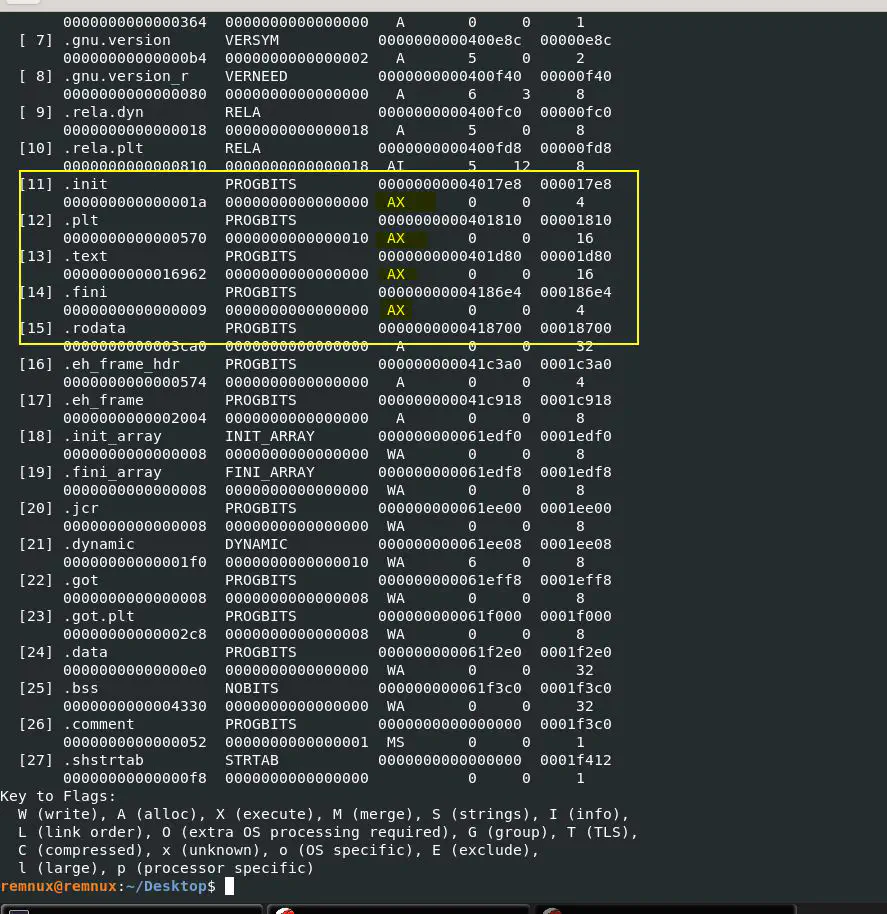
In the output, sections with the X flag are executable.
Method 2: Using Ghidra
In the CodeBrowser, go to:
-
Window → Memory Map.
-
Look for sections with the Execute attribute enabled.
Q4: Which system call/function does the binary use to obtain its absolute path?
There are several Linux interfaces for resolving a program’s own path. The most common approach is calling readlink() on /proc/self/exe (sometimes readlinkat()).
At runtime, you can confirm this via syscall tracing focused on file operations and look for a line like:
readlink("/proc/self/exe", "/home/remnux/Desktop/RotaJakiro..." , 4095) = 39
That call (and its return length) shows the binary is obtaining its absolute path via readlink("/proc/self/exe", ...).
Quick note (readlink vs. readlinkat): Some samples use readlinkat() instead of readlink(). When searching or instrumenting, include both so you don’t miss the resolution path.
Q5: As a persistence mechanism, the malware copies itself to two locations when executed by a regular (non-root) user. What are the names of the new dropped binaries?
Quick detour…
After first execution, the original sample vanishes—this specimen deletes itself after staging persistence elsewhere. A focused syscall trace near program exit reveals something like:
unlink("/home/remnux/Desktop/RotaJakiro.malware") = 0
So it uses unlink() to remove the original.
To keep the file around for repeated dynamic analysis, you can patch the call site so the program believes the delete succeeded but never actually performs it. A minimal, behavior-preserving plan is to replace the 5-byte CALL unlink with xor eax, eax padded with NOPs, and leave the subsequent test eax, eax intact:
Address Original Patch to 00402f50 CALL <EXTERNAL>::unlink → 31 C0 90 90 90 ; xor eax, eax; nop nop nop 00402f55 TEST EAX, EAX → (leave as-is)
Why faking success (EAX=0) is safer than just NOP-ing the call:
- Return semantics:
unlink()returns0on success and-1on failure (witherrno). The surrounding code almost always checks the return value. If you simply NOP the call,EAX/RAXretains whatever garbage was there beforehand, so the following check can misfire and alter control flow. - Flag behavior: Many call sites immediately do
test eax, eaxorcmp eax, 0. SettingEAX=0guarantees those checks behave exactly like a successfulunlink. Even thoughtestwill set flags, zeroingEAXfirst guarantees the value tested matches the success case the code expects. - Instruction size & alignment: On x86/x86-64, a relative
CALLis 5 bytes.xor eax, eaxis 2 bytes (31 C0). Padding with threeNOPs (90 90 90) preserves the original instruction footprint so you don’t shift subsequent bytes and corrupt the function layout. (On x86-64, zeroingEAXalso zero-extends intoRAX, so it’s safe.) - Minimal footprint: You’re not removing the subsequent
TEST/CMP; you’re letting the original control flow remain intact while faking a “success” return.
Quick note (unlink vs. unlinkat): Newer code may useunlinkat()instead ofunlink(). When patching or hooking, cover both so the self-delete can’t slip through an alternate API.
Back to Q5
Now that we can do dynamic analysis a bit easier, these last 5 questions will be smooth sailing (as long as we do not find any more anti debug).
As a refresher, Q5 wants the names of the new binaries dropped by the malware as a persistence mechanism. We can use strace to do this quickly. You could also step through the program in a debugger if you wanted. I will show doing so in the video walkthrough.
Just like the last two questions, research how a binary like this might write files. What system calls should we look for? Try finding some on your own.
After you have done some research, let’s look at our strace output. If you did your research well, you learned there is a system call named open(2) and also openat(2) that opens a file and can create it depending on flags. If the O_CREAT flag is used, the operation will create the file at the specified path. If O_TRUNC is present, an existing file is truncated.
Run strace again and grep for the flag. You can either pipe stderr directly:
strace -f -e trace=%file ./RotaJakiro_Patched.malware 2>&1 | grep O_CREAT
or write to a file and then grep:
strace -f -e trace=%file -o outtrace.txt ./RotaJakiro_Patched.malware
grep O_CREAT outtrace.txt
Quick command breakdown:
-
-e trace=%file
Filter to file related system calls. -
-f
Follow forks, which matters if the sample spawns children. -
2>&1 | grep O_CREAT
Sendstraceoutput to stdout and filter for the creation flag.
If you use-o outtrace.txtinstead, grep that file after.
Result of command:
openat(AT_FDCWD, "/home/remnux/.dbus/sessions/session-dbus", O_WRONLY|O_CREAT|O_TRUNC, 0666) = 4
openat(AT_FDCWD, "/home/remnux/.gvfsd/.profile/gvfsd-helper", O_WRONLY|O_CREAT|O_TRUNC, 0666) = 4
openat(AT_FDCWD, "/home/remnux/.config/autostart/gnomehelper.desktop", O_WRONLY|O_CREAT|O_TRUNC, 0666) = 3
If we check what those files are, you will see that both session-dbus and gvfsd-helper are binaries. The presence of O_CREAT means they will be created if not already present, and O_TRUNC means any existing content will be truncated.
We can then check for process activity related to them. If we grep the ps aux output for those paths, we can find two running processes. It is clear now the malware set up two binaries that mimic legit daemons such as gvfsd and dbus.
So we know our answer for Q5 now.
Q6: Which file does the malware modify to ensure it runs every time a terminal session is started?
Using our understanding of Linux, there are a couple ways malware that wants to start with terminal sessions could do it. For a majority of UNIX users, the default shell or shell being used is called Bash (Bourne again shell). When Bash starts for an interactive non login shell, it reads the user’s ~/.bashrc. So when we look for signs of persistence tied to terminal launches, this is a common place to check. That includes both the content of the file and whether the file was touched during execution. Note that login shells typically source ~/.bash_profile or ~/.profile, and those can be used too, but ~/.bashrc is the usual target for interactive terminals.
If we grep our earlier strace output, we see:
# Command
cat outtrace.txt | grep "bashrc"
# Result
stat("/home/remnux/.bashrc", {st_mode=S_IFREG|0644, st_size=4034, ...}) = 0
If we open .bashrc and look at the bottom, we see the entry the malware added.
Q7: Which technique does the malware use to store strings before decrypting them?
This one is best solved in the disassembler, Ghidra. We want the technique this binary uses to store strings before it decrypts them.
If you have been using Ghidra for other questions, you may have already seen this technique across the binary.
Let’s trace execution and identify the method. After importing the binary into Ghidra, analyze it. Ghidra lands on the entry point. From there, follow to the function that starts the main code flow. That function is FUN_00401d80. Note that Ghidra names unknown functions with the scheme FUN_ plus the address offset, so to find FUN_00401d80 you can go to offset 0x00401d80. In this function we see two string type variables initialized in the decompiled C, _s1 and _s2.
Follow the function it calls to define _s2 since we know it uses readlink from earlier.
Inside that function we can scroll and see an interesting bit of code:
// Snip of C code from Ghidra

local_48 = 0x53;
local_47 = 0xec;
local_20 = *(long *)(in_FS_OFFSET + 0x28);
local_46 = 0xff;
local_45 = 0xa8;
local_44 = 0xb2;
local_43 = 100;
local_42 = 0x3f;
local_41 = 0xc2;
local_40 = 0xdf;
local_3f = 0x25;
local_3e = 0x98;
// continues byte by byte until ...
__path = (char *)FUN_00402b80(&local_48, 0x20, 0x16, &DAT_0061f2f0, 8);
Right above this, all the local_ variables are initialized, and each is one byte. While displayed as individual locals, you can think of this as a byte array.
As it moves down this array we end up with a blob of data:
53 EC FF A8 B2 64 3F C2 DF 25 98 C7 63 72 78 24 19 06 9A 7C 39 E8 4B 94 C6 CE 6D 7B 3A 3F 7C F9
Right after, we see a variable called __path. __path is the result of FUN_00402b80 with parameters that include the data starting at local_48 for a total of 0x20 bytes. We infer that from the starting local and the 32 following bytes, which match the length of the blob.
We then see __path used as a parameter to readlink. So it is safe to assume that this string contains /proc/self/exe. Now, what is this technique called? These are stack strings. The program is initializing the string as individual local variables in the stack frame at runtime.
Why do this? If you write something like:
char *s = "/proc/self/exe";
many compilers place that literal in the .rodata section of the binary, which makes it easy to find with tools like strings or objdump. Instead, you can write:
char buf[32]; buf[0] = 0x53; buf[1] = 0xEC; /* ... */ decode(buf);
When compiled, this looks like what we saw above. The data is built on the stack during runtime, hence the name stack strings. This prevents simple string extraction from .rodata and makes Yara detection trickier for the same reason. Also note that some packers will transform literals into stack strings during packing, so even if you wrote the direct literal, the packed sample may end up using a stack string.
Q8: What is the address of the function responsible for decrypting strings if the image base is 0x400000? This function is typically invoked right after each encrypted string is built on the stack.
Looking back at the code above:
__path = (char *)FUN_00402b80(&local_48, 0x20, 0x16, &DAT_0061f2f0, 8);
This is where the path gets decoded by FUN_00402b80. We see this function called whenever a stack string blob is constructed, and it takes the blob pointer and length as parameters. Shortly after, the decoded result is passed to readlink, which would not work on encrypted data. Inside FUN_00402b80, we also see two helper functions that clearly implement parts of a cipher or decoder.
Q9: Which system call or function is used by the malware to delete the original, first executed, file?
I will leave this to you. It is easy and we already covered the pattern earlier. Hint: look for unlink and unlinkat in strace, just like you looked for readlink and readlinkat.
Q10: The malware decodes four embedded strings representing command and control domains. What are these domains?
We can use Ghidra and GDB to find them, but let’s start faster by capturing outbound DNS traffic during execution with tcpdump:
sudo tcpdump -i <interface_name> 'dst port 53'
Using the above command, capture DNS queries and inspect them for useful domains.
14:34:32.548492 IP remnux.57955 > _gateway.domain: 15375+ A? blog.eduelects.com. (36)
14:34:32.550594 IP remnux.46845 > _gateway.domain: 18770+ A? 0b3l1sk.me. (28)
14:34:32.552689 IP remnux.59256 > _gateway.domain: 51094+ A? cdn.mirror-codes.net. (38)
14:34:42.555143 IP remnux.46821 > _gateway.domain: 56806+ A? status.sublineover.net. (40)```
Those are the four C2 domains.